Veterinary Microscope with 100X DRY Objective - NEVER USE OIL AGAIN
Measuring with a Microscope - Dino-Lite
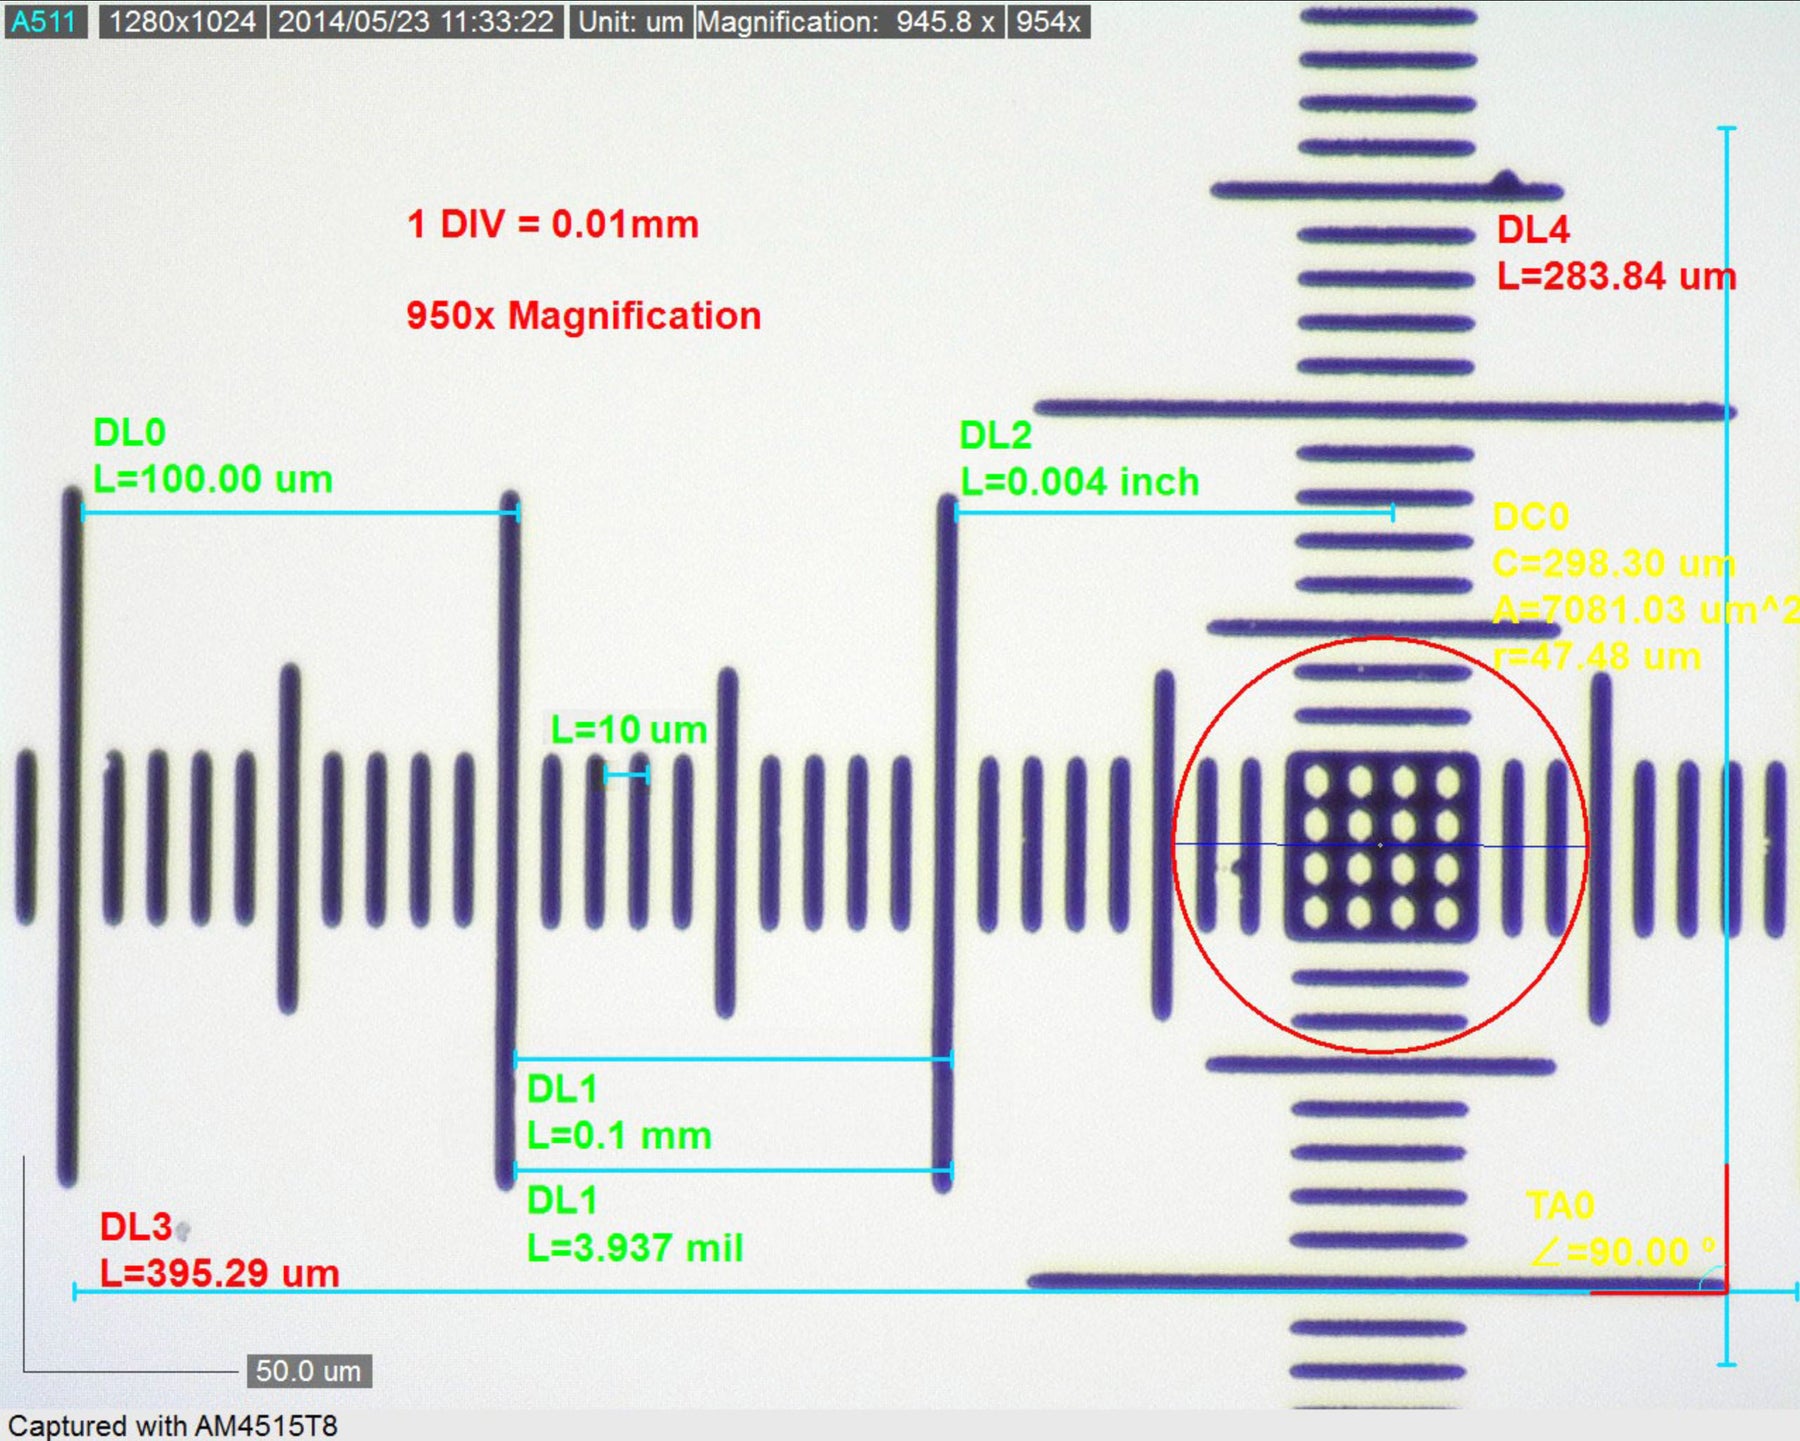
One of the most popular features of Dino-Lite software is the measurement function.
If you want to measure (and label) any still images you’ve taken – or even a live microscope image – you can take advantage of Dino-Lite’s powerful array of measurement options.
Dino-Lite microscopes come with a versatile and easy to use software suite – DinoCapture for Windows or DinoXcope for Macs.
This short guide explains you how you can calibrate and use Dino-Lite’s measurement features with exceptional ease.

Taken using the Dino-Lite AM7515MT8A Digital Microscope
How to calibrate your measurements
The first step is calibrating your microscope’s measurements for the magnification you’re using. Not to worry, it’s quick and easy.
You need the following:
- your microscope, plugged in and ready
- your computer (with the software installed and open)
- the ‘calibration target’ that came with your microscope – the small slip with the measurement scale on it.
The layout of the software is a little different between Windows and Mac versions, but the process is largely the same.

For Windows
- On the toolbar at the top of the screen, click on the calibration icon on the right side – the icon looks like the head of an adjustable wrench or spanner.
- Select ‘New calibration profile’.
- Name the new profile. It’s a good idea to include the magnification and calibration length you’ll use for your future reference.
- Click ‘Continue calibration’.
A small window will pop up – simply follow the steps in the window and you’re good to go. You’ll need to have your calibration target underneath your microscope and in focus for these steps
For Macs
- First, you’ll need to open an image. Select the ‘Tools’ heading at the top of the screen and clicking on ‘Open selected image’. It can be any old image you’ve captured or an in-focus image of the calibration target.
- The newly opened image will have a series of dropdown menus at the top. Click on ‘Calibration settings – none’, then select ‘Open calibration manager’ from the dropdown menu that appears.
- A new window will pop up. Simply follow the steps as instructed by the window. (If the image you originally opened wasn’t of your calibration target, the prompts will ask you to take a picture of your calibration target, so make sure you have it handy.)
Whether you’re using Windows or a Mac, try to use a calibration profile that’s closest to the magnification you’re currently doing measurements on.
While it’s possible to use calibrations you made at different magnifications, the further your calibration magnification is from the current image magnification, the less accurate your measurements will be.

How to use the measurement function
Dino-Lite’s measurement function is simple but powerful.
You have a wide range of measurement and annotation options – you can measure and label distances and angles using an array of lines, customisable shapes and multi-point structures. These features make your work more efficient.
There are some minor differences between the Windows and Mac versions, but they function the same way.
For example, on the Windows software, the various measurement options appear at the top of the screen as illustrated icons that suggest how they function. If you hover the mouse pointer over an icon, it will tell you the name of the function.
Instead of icons, the MacOS software has a series of dropdown menus that list the available measurement options.

General instructions
- Open the image (or the live feed) you want to measure.
- Input the magnification of the image into the box in the empty field in the top right (bottom left of the menus for Macs). The magnification will be on the dial on the side of your microscope.

- Select the units of your choice from the dropdown button next to the magnification field (mm, inches, etc.)

- Select the type of measurement you want to use from the top icons (or Mac dropdown menu)
- Accurate image analysis is now within your grasp.
Sound good? Are you ready to try it yourself?
 Captured with the Dino-Lite AM7915MZT Digital Microscope
Tips
- When using measurement functions with multiple points, single clicks will place down a point, while double clicks will complete the measurement.
- If you make a mistake and wish to undo it, you can press Ctrl + z for Windows, or Command + z for Macs.
- Right clicking and selecting ‘Clear’ will let you remove drawings or measurements from your image.
- Holding down the Shift key will let you draw perfectly straight lines.

Captured with the high magnification Dino-Lite AM7515MT8A Digital Microscope